16.5.20

Vox Foundation restauration

i'll be honest - i was looking at the Jext Telez 'White Pedal', being utterly fascinated with some 60's bands' Fuzz Tone. and then i came across this here second hand beauty: a Vox Foundation Amp.


marketed as a bass amp, this series of amps (the Supremes) was basically Vox cutting and pasting with different preamp modules and different power amps.
so this is a bass amp, because it lacks the tremolo and reverb as found on the guitar versions (the more notorious Defiants and Conquerors.)


>> here's a Defiant in front of a Vox Conqueror. ha. ha.
(did i tell you about how i met Yoko Ono at the vennice biennale in 2003? maybe some other time. she was nice, though.)

anyway, back to the amp - apart from these omissions, the preamps and the power amps are exactly the same. the distinction becomes pretty small, especially with there being a 'normal' and a 'bass' channel on the Foundation.. very Fender Bassman-ish, i guess.
and what do we see on the normal channel?
yes indeed - distortion, and the infamous MRB or mid-range boost. like a fixed wah. so, think that same White Pedal, but unwieldier. is that a word? yes, it is.

now this was for sale as is, meaning: it hums like a bastard and that's all she does. but since i could get my hands on it for less than the price of the above mentioned pedal, i decided i could always try to get the preamp (my section of interest) up and running and gut it for a True Vintage Kvlt Pedal or something.
i gave that a half-assed try at the time, noticed even the mixer section (mixing both channels together to feed the power amp) was giving me overdrive - not good - and put it aside as there were far more urgent matters to attend to.
and then, of course, it sat there on the shelf for two years plus.

last month, however, the global pandemic that is Covid19 allowed me the opportunity to lock myself in and get kicking on some projects that i had been neglecting for too long.

with some help from Nick over at www.voxsupreme.org.uk, i dated it based on capacitor codes etc.. this particular amp was placed rather firmly in february 1967. that makes it over 50 years old, and one of the earliest ones to survive at that. all of a sudden, the idea of tearing up an amp with that much history, and an amp type that's becoming increasingly rare at that, just for the preamp/fuzz.. i just couldn't do it. call me sentimental.

so i set out recapping this bad mofo.
out the window with vintage value, i say - the show must go on!

'normal' aka guitar preamp board
upon closer inspection, it turned out that every single electrolytic cap needed replacement. and not just in the power amp: every single one of them. you see those little yellow buggers? dry as a hungover crust punk's throat on a tuesday morning. no wonder the whole thing was out of whack.
that same board after recap, for reference..


nice and shiny.
did every single board, replaced just about every cap in there, for both pre- and poweramps.

Full pre: 'normal', mixer, 'bass' boards. MRB caps + coils to the left.
in the pic above, notice the hammond-organ style connector bottom right: that connects preamp and power amp sections, feeding power to the preamp and returning the preamp's signal to the power amp. meaning power lines and signal are running through the same unshielded multicore cable. there's better ideas out there, i guess.

it still hums quite a bit, but in light of the signal to noise ratio, not a problem. because make no mistake: at 50 watts, this thing will blow the windows out of your neighbours apartment. it is not just loud. it is LOUD. like it's-the-sixties-and-what's-a-P.A.?-loud.

the sounds are more than decent for guitar, at least on the normal channel (the X-tone on the bass channel doesn't play nice with 6-strings). it does have that immediate directness i associate with high power transistor amps (jazz chorus, anyone?), which can be the greatest thing ever or the most annoying thing ever, depending on who you ask. honestly, i never could get along with those kind of amps - but i'm as yet undecided about this one, because unlike the jazz chorus it breaks up nicely and the fuzz is totally lovely. even if it is not as loud as the clean mode, and even if it pops like a basterd when switched on. the MRB might be more of a gimmicky feature than i had hoped, but i guess for studio use it can definitely have its moments. maybe i'll think higher of it after using it in a band situation. so i guess i'll have to play it some more to get used to it, because i'm really used to the sag and compression of my trusty AC15.. but it makes for an interesting addition to the family, to say the least.

11.5.20

Principium 3.0: under the hood 3

aah. wiring.
the keyboard obviously has thirteen wires: one common (+3.3v) and then one for each key contact, all running to Bela's digital I/O pins.
add in twelve pulldown resistors to make it all behave: done.


next , i threw in the only thing i bought extra. an M-Audio Midisport 1x1. cheap, reliable, small footprint when uncased: no need to reinvent the wheel there. in the end i ran wires from the input port to a panel mounted 5 pin jack, keeping the integrity of the M-Audio. because you never know.
i cut a USB cable in half, plugged it into the Midisport, and soldered the other end to the bottom of the BBB's usb host port. a plug would have been in the way too much there. so now Bela recognises it at startup and acts as a host - works flawlessly. if i ever want to use the host port for something else, i can just unplug the Midisport.

then - a little show and tell for jack wiring.


i used switching jacks, and came up with the above.
a single mono cable in the left output jack sees a mono mix of the L and R channels through the two 1k resistors.
obviously we can put another mono cable in the right output jack - that breaks the mixdown connection and now we have dual mono, split stereo, whatever you want to call it: L channel on L jack, R channel on R jack. the standard, quoi.
what you don't see too often is option 3: nothing in the left jack, but stereo on a TRS cable in the right jack. nice for using a Y-cable. and if you should accidentally plug a mono cable in there with the L jack empty, you'd just pull the L channel to ground through the 1k resistor, so no problem. no stereo, no mixdown, but no problem.


 then, horror of horrors - the display.
i picked a double digit 7 segment display out of the scrap box. must've pulled it out of something, but can't remember what. tested it, got every segment lighting up on the breadboard - great.
ordered me some 40110 CMOS counters, since you can clock those to count up and down - perfect for bank selection - and they can act as a 7 segment driver! sounded Purrfect.
however.
in my enthousiasm, i failed to realise there's two types of 7 segment displays: there's common cathode, which the 40110 likes very much, and then there's common anode, which the 40110 doesn't quite get along with. guess which one i had.
now i could have ordered me some new IC's, but that meant waiting.
i could have inverted all the 40110's outputs, but that meant inverting 14 signals and it seemed like too much hassle - and real estate.
i could have ordered me a new display, but it had cost me so much effort to make a hole in the front panel to fit this one, that i didn't want to go through that again. (and believe me, i checked - couldn't find any new ones with the exact same dimensions.)


in the end, i dug up an ancient Arduino Duemilanove which wasn't seeing much action - C++ and all, you know.. not my bag - and i guess it's about to go unsupported soon anyway. hah.
the benefits were that it could receive 3.3v signals and see them as HIGH (which the 40110 wouldn't have running at +5v), i could invert however much i damn well pleased, there were 7 segment libraries to be found and, within reason, i could interface with the display directly without having to come up with extra circuitry.
i tried to multiplex the two digits with the SevSeg library. meaning: the arduino lights up one digit at a time, but so fast you see both of them light up. which spares you some pins, since you only need 7 segment pins and not 14 for two digits. now, this only worked with resistors on the segments for me (the other option being resistors on the digit pins), and results in terms of luminosity were disappointing to say the least.
after much trial and error and measurements, i actually initiated two SevSeg objects (one for each digit), i'm driving every single led LOW on it's own pin on the Arduino, and i'm using every single pin on the Duemilanove except one (0= rx).
the display power source is the raw +5v output on Bela (straight from the wall wart, basically), the Arduino itself is powered from the regulated +5v USB out on Bela to the +5v pin on the Arduino. i know this is not recommended practice, but that's only because you then bypass the arduino's own regulator. since this is already regulated it won't damage anything.

i don't know the specifics of the display itself, but the current limiting resistors i used were surprisingly low: i have 100 ohms on each pin, and current draw is about 170mA when displaying the number 88 (all segments lit.) that's not too close to the 200mA limit of the Arduino, and i don't see myself using 88 soundbanks any time soon. every other number is below that: on average i would say i'm drawing something like 100 to 120mA, which seems fine.
the only thing that is a tiny bit stupid is that, at startup, the segment connected to pin#13 lights up by itself. probably to do with the internal resistor+led. if i feel very brave, brave enough to brave the hot glue barrier i created myself, i might swap that pin for the DP on the display - the decimal point, aka the little dot in the corner. wouldn't mind that so much.


close-up of the opened back panel. to the left is Bela, usb cable for the midisport visible underneath. the microSD card is right next to the miniHDMI, so easy enough to pull. next to Bela is display driver buddy Duemilanove. which has a little reminder to unplug the +5v line should i ever want to reprogram it.

Principium 3.0: under the hood 2

now then. Finally on to hardware hacking!

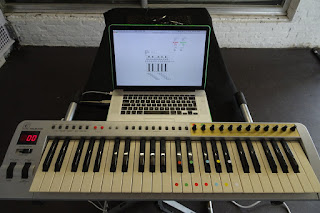
years ago i found an old midi keyboard lying in the street.
a fine donor keyboard if ever there was one. needed some cleaning up, but hey. don't we all.


.. and then all of a sudden i had a setup that seemed like it just might work.

continuing the repurposing game, i used scrap wood bits, and sliders and buttons i still had lying around. i messed up the holes for the buttons and display pretty badly, and i hate the shiny white kitchen cupboard material to work with with a vengeance. well, once you start, no way back.


all oiled up!
now just cram everything in there.


Principium 3.0: under the hood 1

follow up on previous preview post..

i'd been chewing on this idea for a long time - i even had a software mockup of this very thing at the 2.1 record presentation, so we're talking at least july 2016. i was running the loops in Ableton, and i wrote a PureData patch that took my midi keyboard input and turned it into volume controls for the Ableton channels over midi.


(i knew i had a pic of that setup somewhere.)

but i always knew i wanted this as a standalone instrument.
now, to bring this to life had its problems - i didn't want to compromise on audio quality, and running a dozen 5-to-10-minute loops is not exactly easy with tapes or anything in the analog domain - let alone portable.
so enter digital.
i tried several platforms - i tried an Axoloti, and i tried a Robertsonics WavTrigger, both of which are awesome in terms of audio quality and ease of use. but alas, while the Axoloti shines at DSP and synths (no, really! check it out.), running 12 stereoloops continuously just isn't its forte. i'm sure i'll find a new use for it soon enough - it was just the right platform for the wrong job, or something like that.
and while the WavTrigger will handle that same wrong job no questions asked, fade in and out times (over midi) are restricted to a 2 second maximum - not nearly slow enough for my purposes (i'm running fade times of over 5 seconds at the moment) and at the other end of the spectrum i had some nasty glitches going below a couple hundred ms attack time, which is no fun for a keyboard instrument. in fairness, it only craps out on the fades - if you tell it to jump to a certain volume it will do so instantly.
i did try ditching the midi altogether and running serial control with an Arduino, calculating my own fades and whatnot. and while i learned a lot, my coding skills are still way below par, the fastest times were still glitching in the end and it all became well frustrating.
again, i'll definitely be using the WavTrigger for other things in the future - the things it does well, it does really really well. but what i wanted from it was a bit beyond its limits, i'm afraid.
i was looking at the Robertsonics Tsunami, because it has multiple outputs that i could route to, but then i'd need two of them and come up with 24 external VCA's or something..

and then someone pointed me towards Bela.
an audio-centered open source platform that runs PureData patches! a light at the end of the tunnel!


well.. in all honesty, it was a dim light and a very long tunnel at first.

i don't know the first thing about linux (Bela sits on a BeagleBone Black, basically a mini linux computer), i had never ssh'd into anything before, and Terminal was an application i had so far only opened by accident. but okay. bite the bullet.
after a bit of a bumpy ride - and a lot of forum support - i got Pd up and running with the externals and libraries i needed installed, and Bela willing to read .wavfiles from an external SDcard which will mount when hot swapped. phew!
after that, it was 'just' Pd. took me a long time, but all in all it was still relatively easy - as i will obviously take Pd over C++ any day of the week. maybe i was just happy to be on more familiar ground again.

sidenote: i never got round to trying a Raspberry Pi, because Bela caught my eye sooner.
the Pi will run Pd patches as well, and seems to be the cheaper board, so it could be a contender.
the focus is definitely not on audio though - as i understand it, you would at least need to add a decent DAC. one pretty interesting piHat i spotted was the Blokas Pisound, but then you end up in the exact price range where Bela sits. and apparently the pisound has a bit higher latency, so no regrets.
the only thing i would really like is for the BBB to boot a bit faster, but ok. their claimed 10 seconds is fast, but not while you're onstage having to reboot because some idiot pulled your plug.

10.5.20

Principium 3.0: quick preview

may i proudly present, the third installment of what is slowly becoming the ongoing Principium series: Principium 3.0!


what is it, i hear you ask? well, it's an instrument somewhere between a stubborn Mellotron and the Principium 2.0 record installation.
that is to say: it plays back 12 loops continuously, and when you press a key the volume of the respective loop opens up. so unlike the Mellotron, there's no retriggering - you get to hear the loop where it happens to be at that point in time.
to the left are master volume, and the attack and release sliders determining fade in and out times. which is actually more Solina than Mellotron, but who's keeping score.

my basic idea for a single loop is pretty simple: to have several octaves of a single note (say C1, C2, C3, C4 etc) fade in and out and overlap with eachother, disappear and reappear, maybe with different timbres, filtering and processing.
then you have twelve of those loops, each with its own dedicated note. and if they are of different lengths, they will start to overlap in unpredictable ways after a while. so if you play a sustained chord, not only will the sound 'move', but it will also be impossible to predict which inversion of the chords you'll be playing, aka which of the notes will be the highest or lowest in the chord. since with several octaves fading in and out, that doesn't necessarily respond to the order of the keyboard anymore. which is exactly what happened in the 2.0 installation.

so right now i obviously have it running all twelve Principium 2.0 records - but it reads sets of 12 .wav files from a microSD card, so it can hold multiple soundsets. hence the 'bank' selection buttons. the display shows the number of the current set. and i'm very much in the process of recording new sounds for this baby.


back panel view: above the DC barrel jack there's a stop/reload switch for safe removal of the SDcard, so you can load new files without having to reboot or power down. next to that 2 output jacks: left/mono (summed) and right/TRS, so you can have stereo over a single Y-cable. and you can even hook up a set of speakers for standalone operation!
woops, forgot the 5 pin midi input. so it accepts midi (well, note on/offs) - although an 88 keyboard will still be reduced to a single octave. and with a push of the button you can select what midi channel it responds to (from 1 to 12, selected via keyboard).

the panel on the right opens up to access the SDcard, the Bela that runs the whole thing, and the arduino that handles display duties.

still some software upgrades to do, and i need to get me some swanky fader caps for the sliders, but for now: happy camper!!


30.4.20

Pasco 9301A mod

'Fruit flies when you're having Fun', i recently read somewhere.

a long long amount of fruit ago, Wietermans Dockxmans presented me with a Pasco Scientific 9301A dual function generator. which has banana jacks. banana, get it?


anyway. the thing has inputs to modulate the frequency of the generators, but they work backwards. so higher CV input = lower frequency. which feels quite unnatural if you're driving it with other gear.
some previous owner added CV in jacks (wired straight to the frequency pots), but they had the same problem. i guess it's just how that Intersil 8038 IC works.

original schematic:


the internal modulation (i.e. modulating one generator with the other) can just stay as is.
and, of course, those huge dials need to function in the same direction as ever.
so i ended up with the following:
- run the original CV (from the dial) through an inverter, so that it's flipped the wrong way round.
- add the external CV and any needed offset to it.
- run all this through a second inverter, so that the original is back where it needs to be, and the external CV is flipped (which was the original objective.)

crudely drawn schematic:


for clarity's sake: i pried loose the connection between the freq pots and the pcb. this sits in between there now. i do realise it is rather crude, in that the original frequency scale of the dials is no longer valid. i had to scale the whole thing - both CV and original pot voltage - down to a useable range.
i probably could have more or less avoided that, but i'm not sure i could get it done with just a single 072. and anyway, since the amount of possible pitch shift is dependent on the chosen setting of the oscillator (one of 5 ranges), and it never even comes close to V/oct, this is basically a fancy Spacey noisemaker so i quit caring about accuracy. mainly i opted not to introduce unwanted distortion at the extremes of CV input.

in the end i added a master volume as well (bottom right in top picture.)
looking at the schematic, there's probably a lot more options for mods, external VCA  inputs etc., but it's pretty versatile as is so i'm not sure if it is worth the extra trouble.

 both channels' CV mix boards.

CV input jacks and master output jack.

4.12.18

Dual Reamper build


got asked to build a reamper - well, not one, but two.
the idea is that in a studio environment, it can be a lot of fun to run just about anything from your DAW through a pedal+amp setup again.
even more fun is the possibility to run everything in a nice wide stereo.

so, what we decided on:build two mono reampers in a single box, for convenience.
more convenience is provided by Neutrik Combo Jacks.
we want the possibility to run just one input to both outputs (mono in, stereo out), to use two different amps on one guitar at the same time, for example. or to layer two effect chains - you name it.
that does require the extra possibility to flip the phase, if you want it done right.

i thought about having 'master' functionality where one set of controls would control both paths at the same time, but since the whole idea of this setup is mostly to be able to use two different chains, they will probably require their own settings anyway. so that idea got scrapped.

a little google session gave me a couple of interesting links.
i used the same Edcor brand xformers as they do here, which basically uses a variation on the classic Jensen schematic. no need to reinvent the wheel there.


while Jensen proposes a 10K:10K, some schematics use a different ratio xformer, like 10k:600. terminating the secondary with a resistor closest in value (680R). i tried both varieties, and i must say the 10K:600 doesn't quite cut it for me, levelwise. it just doesn't provide the punch of the original signal to my ears.
the 10K:10K, on the other hand, provides ample level and will play very well with dynamic recording levels in your DAW.. read: if you're not pushing up against 0dB all the time it's about plug-and-play without too much fiddling with the level control. so that'll be the transformer of choice here.

as for phase switching, i found several people hinting at just swapping the wires of the (isolated) output jack. while that might do the trick in a standalone mono box, it didn't seem to play nice in the dual box i was building. so i flipped phase right at the secondary, before going into the level pot. that works well.

one thing i was sort of worried about, was feeding two transformers with a single signal, without a buffer of sorts. worried about impedance issues and whatnot.
testing with my own soundcard, there was no problem at all - no audible difference on the outputs while feeding one or two chains. no problem, no problem solved. hah.

here's the full schematic of the build.
who knows, someone might have a use for it.
someday.